Para quem está configurando ou corrigindo algum certificado instalado, o atalho facilita:
- Pressione Windows + R
- Digite: certmgr.msc
Para quem está configurando ou corrigindo algum certificado instalado, o atalho facilita:
Se deparou com “Sua conexão não é particular” como na imagem abaixo, verifique se o erro é com o certificado DST Root CA X3.
Sua conexão não é particular.
Neste caso o erro no certificado é causado pela expiração do certificado da (CA) Autoridade Certificadora DST Root CA X3 em 30 de Setembro de 2021.
Este certificado não será atualizado e quando os navegadores principalmente o Chrome e o Internet Explorer não atualizam a cadeia certificadora dizem que o site não é confiável. O Firefox é melhor e mais seguro nessas operações e não chega a dar problema.
Podemos verificar melhor o que esta acontecendo clicando em “Não Seguro” e depois em “Certificado inválido” como na figura:
Não Seguro. Certificado inválido.
Demora um pouquinho para aparecer as propriedades do certificado com problema, depois clique na aba “Caminho de Certificação”:
Propriedades do certificado inválido.
Observe o “x” vermelho em DST Root CA X3.
O certificado vencido deve ser substituído pelo novo ISRG Root X1 que passará a fazer as validações futuras.
Em alguns sistemas e no Firefox basta acessar:
https://valid-isrgrootx1.letsencrypt.org
Isto faz com que a cadeia certificadora do seu sistema seja automaticamente atualizada e nada mais será preciso.
Mas como a TI é uma ciência exata… kkk Talvez você tenha que fazer a correção do sistema manualmente, principalmente nos Windows 7.
Para corrigir manualmente vamos primeiro mover o certificado velho para uma lista de não confiáveis.
Execute o Gerenciador de Certificados, para isto podemos acionar a tecla do Win + R e na caixa de diálogo Executar digite certmgr.msc e OK. Clique em “Autoridades de Certificação Raiz Confiáveis” depois “Certificados”, na direita aparecerá uma lista de certificados. Clique com o botão direito no certificado velho “DST Root CA X3” e escolha “Recortar”, depois abra “Certificados não Confiáveis” e “Certificados” na parte direita da janela clique com o botão direito abaixo dos certificados listados e escolha “Colar”.
Gerenciador de certificados
Agora vamos instalar o certificado novo, acesse o site da Let’s Encrypt que é uma ONG que fornece certificados confiáveis e gratuitos para sites
https://letsencrypt.org/certificates/ clique no primeiro link parra download do certificado ISRG Root X1.
Ou apenas baixe do link abaixo que da acesso direto.
https://letsencrypt.org/certs/isrgrootx1.der
Baixe este certificado, depois na pasta onde ficou salvo (não abra) clique com o botão direito do mouse e selecione “Instalar Certificado”.
No Assistente para Importação de Certificados, depois do “Bem Vindo…” clique em “Avançar” e na tela seguinte marque “Colocar todos os certificados no repositório a seguir”, clicar em “Procurar” e escolha a pasta “Autoridades de Certificação Raiz Confiáveis”, clicar em “Avançar” e “Concluir”.
Importar Certificado
Já que estamos falando de Windows talvez seja necessário reiniciar o sistema…
Pronto! Cadeia de certificados corrigida.
Mais informações em:
https://docs.certifytheweb.com/docs/kb/kb-202109-letsencrypt/
A Windows security update released in January and now fully enforced this month is causing Windows users to experience 0x0000011b errors when printing to network printers.
In January 2021, Microsoft released a security update to fix a 'Windows Print Spooler Spoofing Vulnerability' tracked as CVE-2021-1678.
"A security bypass vulnerability exists in the way the Printer Remote Procedure Call (RPC) binding handles authentication for the remote Winspool interface," explains a support bulletin about the vulnerability.
When the security update was released, it did not automatically protect devices from the vulnerability. However, it did add a new Registry key that admins could use to increase the RPC authentication level used for network printing to mitigate the vulnerability.
In other words, this security update did not fix any vulnerability unless a Windows administrator created the following Registry key:
[HKEY_LOCAL_MACHINE\System\CurrentControlSet\Control\Print]
"RpcAuthnLevelPrivacyEnabled"=dword:00000001
However, in this month's September 14th Patch Tuesday security updates, Microsoft automatically enabled this setting by default for every Windows device even if that Registry setting was not created.
Once this mitigation was enabled by default, Windows users began experiencing 0x0000011b errors when printing to network printers.
This printing error is mainly seen in small business and home networks that can't take advantage of a Kerberos setup on a Windows domain.
Uninstalling September's Windows security updates will fix the problem, but now the devices will be vulnerable to two vulnerabilities, PrintNightmare and MSHTML, actively exploited by threat actors.
A better method is to disable the mitigation for CVE-2021-1678 until Microsoft comes out with new guidance, as that vulnerability is not actively exploited.
How to fix the 0x0000011b printing errors
To fix the recent 0x0000011b printing errors without removing the current Windows Updates (KB5005565), you can instead disable the CVE-2021-1678 mitigation enabled by default this month.
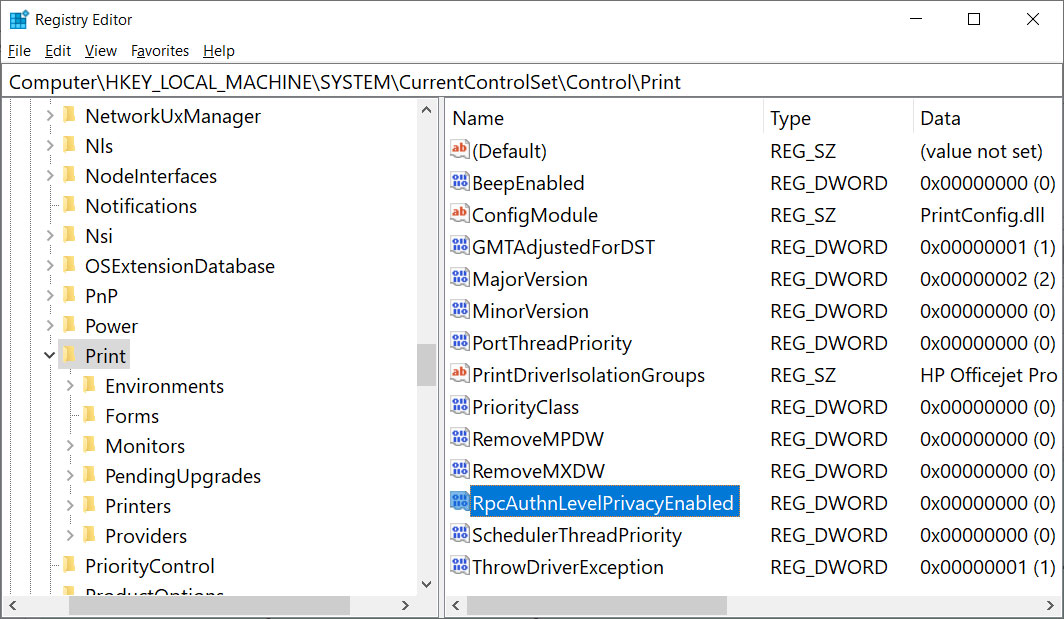
To do that, open the Windows Registry Editor and navigate to the HKEY_LOCAL_MACHINE\System\CurrentControlSet\Control\Print key, create a new DWORD-32 bit value named RpcAuthnLevelPrivacyEnabled, and set it to 0, as shown in the Registry file below.
Windows Registry Editor Version 5.00
[HKEY_LOCAL_MACHINE\System\CurrentControlSet\Control\Print]
"RpcAuthnLevelPrivacyEnabled"=dword:00000000
To make it easier to add this change, you can use the fix-0x0000011b.reg Registry file to add it for you.
Download this file on both your print server and your Windows devices connecting to it, double-click on it, and allow the data to be merged.

Once you disable this mitigation, you will no longer be protected from the vulnerability, but it will hopefully allow you to print again.
If this does not solve your problem, use the enable-RpcAuthnLevel.reg to go back to the Windows defaults.
fonte original: https://www.bleepingcomputer.com/news/microsoft/how-to-fix-the-windows-0x0000011b-network-printing-error/
https://www.catalog.update.microsoft.com/
Instalar/Atualizar o IE11
Instalar o KB2882822
Instalar o KB2888049
Instalar o KB3140245